Chicken,Cheese, and Spinach Pita Pocket
I ate this for lunch yesterday, and it was marvelous! It was small but still filled me up. This Pita Pocket is full of protein from the chicken and the spinach is packed with vitamins. This is a healthy and easy dish for a packed lunch. Plus, it's better than a sandwich.
Ingredients:
1 cup Grilled Chicken
 2 cups Spinach
3-4 oz. Any Cheese (I used Feta Cheese)
1/4 cup Ranch
What You Will Need:
Cutting Board
Knife
Mixing Bowl
Large Plastic Tongs
Small Tupperware
How to Make Your Chicken, Cheese, and Spinach Pita Pocket

2. Once your chicken is done cut into small chunks on your cutting board. Make sure your chunks are very small so they will fit in the pita pocket.
3. Measure out your chicken and dump it in a mixing bowl.
4. Measure out your spinach and add it to the chicken. Start mixing the two ingredients together with your tongs or a mixing utensil.

5. Add desired amount of cheese and Ranch to the chicken and spinach. Mix all four ingredients together.

6. Stuff your mixture into the pita pocket. If you have leftover mixture you can make another pita pocket or save it for the next day.
7. Place your pita pocket(s) in your small tupperware and your lunch is 1/3 of the way packed!
Pencil Fruit Kabob

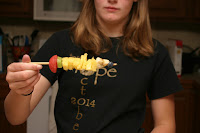
I first thought of this idea when the three of us girls were talking about a Back to School theme week. Food placed in a certain way to look like a pencil. Once we continued to brainstorm I thought of watermelon and pineapple. How about a fruit kabob! This is something different and a variety of fruit lined up in a creative way. Have fun making this kabob, I know I did!
Ingredients:
 Pineapple
 Banana
Kiwi
Watermelon
Blueberry
What You Will Need:
Chopstick or Skewer
Cutting Board
Knife
Ice Cream Scoop
How to Make Your Pencil Fruit Kabob

1. Set your cutting board on a clean surface. Chop off the stem of your pineapple. Cut your pineapple in 1x1 small chunks. You will most likely need 5-7 chunks. Take your chopstick or skewer and stick it right through the center of the pineapple. You have made the middle of your pencil!

2. Peel the banana and slice it into pyramids. Slice the pyramid in half but make sure the banana is thick enough to stay on your stick. Poke the base of your banana triangle next to either side of your pineapple on your skewer.

3. Next peel the kiwi. Slice the peeled kiwi into slices and cut those slices in half. Push the center of the kiwi on the opposite side of the banana on the skewer.

4. You might have been wondering why you would need an ice cream scoop for a fruit kabob. Well, it may be a little out-of-the-box but you are going to have a scoop of watermelon for your pencil eraser. Stick the scoop right next to the kiwi on your skewer.

5. You could say this is the easiest part of the whole kabob. Grab a smaller blueberry and push it in next to the banana triangle.
6. Can you see the shape of the pencil? Your lunch is more than halfway done!
Chocolate Chip Rice Krispie Treat
 My mom and I were talking about this post and I asked her if she had an idea for a little dessert for a packed lunch. We started thinking of small sweet snacks, rice krispie treat popped up in the conversation. Super easy to make and pack for a lunch sweet. I added chocolate chips just to add a little more sweetness.
Ingredients:
1/4 cup Butter or Margarine
1/2 cup Choc. Chips
1 Bag of Marshmallows (10 oz) or 4 cups of Mini Marshmallows
6 cups Rice Krispie Cereal
What You Will Need:
Non-Stick Spray
13x9-inch Pan
Large Saucepan
Measuring Cup
Large Plastic Spoon
Large Bowl
Small Spatula
Butter Knife
Ceramic Wrap
How to Make Your Chocolate Chip Rice Krispie Treat
1. Grease the 13x9-inch pan with the Non-Stick Spray.
2. In the saucepan melt the butter, marshmallows, and chocolate chips over LOW heat. Stir constantly so your chocolaty goodness doesn't burn your pan.
3. Once your marshmallows are melted completely remove saucepan the from heat. Don't forget to turn off the stove! Add Vanilla and continue to stir your goodness.
4. Measure the cereal and pour into the large bowl.
5. Mix your chocolaty goodness and cereal together with your spoon. Make sure you scoop out all of the mixture from the saucepan with your spatula.
6. Dump your Rice Krispie mix into the 13x9-inch pan. Let it cool.
7. Cut your Rice Krispie Treats into small squares and wrap in ceramic wrap. Place in your tupperware with the rest of your lunch. You are finished!
- Anna Banana


That looks fantastic! thanks for sharing the recipe.
ReplyDeleteorder online food
ReplyDeleteThanks so much for an amazing blog! So much work and sharing. I am truly impressed.
http://chowringhee.in/