Sunday, August 30, 2015

Heart to Heart: Faithfulness into the Unknown

Photo by: Canva.
Ruth is a book of only 4 chapters but yet a book that holds such wisdom and depth. In our youth group girls’ Bible study we had decided that we wanted to read Ruth after we completed Esther. It was the night before Bible study and I still hadn’t read Ruth yet. I knew that I needed to so I could be semi-prepared for discussion the next day. I started reading Ruth that night and found everything so interesting. Ever since I was a little nursery kid I had always heard the story of Ruth but back then it was just a story from Sunday school. While I was reading that night I realized how selfless of a person Ruth really was. She left everything she knew, her home, her religion, and her family to follow her deceased husband’s mother to her home land. Naomi was literally sobbing and pushing Ruth away telling her not to follow her but Ruth would not budge. Ruth 1:16- But Ruth said, “Do not urge me to leave you or to return from following you. For where you go I will go and where you lodge I will lodge. Your people shall be my people, and your God my God.” You don’t find that kind of loyalty very often. Ruth had no idea where she was going or what she was getting herself into, but she knew that she was going to follow Naomi with all her heart. I then started to think about my own life, do I show loyalty like that to the people that are close to me? Do I show it to God and let Him be in charge of my life? I realized that the answers to these questions were no. I am not allowing God direct me on a path without questioning him or without thinking of all the other possible routes I could take before agreeing to God’s path. I started to realize that I need to show faithfulness like Ruth, to not question anything but have child-like faith and know that whatever God is telling me is the best thing for me.  With big decisions coming up around the corner I am slowly working on letting go of control. I am working on letting God shine the light on His path, whether it be through my mom reminding me of all the options out there or my dad encouraging me to think of the future after college. I have to be honest and say that it’s not the easiest thing, but I know that God is working on my heart and reminding me that He is always right. So today I encourage you to remember the story of Ruth and maybe start thinking- am I on my own path or God’s path?
With love, 
Caroline.


We are officially at 100 likes!! We are grateful to all of our supporters and thank you from the bottom of our hearts!
Posted by 2blondesandaredhead blog on Thursday, August 27, 2015


Follow

Sunday, August 23, 2015

Namaste | Katie

http://www.hotasanayogastudio.com/


This weekend I went out of my comfort zone and did something very different! My friend Chloe and I went to hot yoga. If you weren't sure what hot yoga is, it's an instructed yoga class with a spin to it. The class is heated which allows you to push your mind and body to the limit!
When we first walked in it was about 82 degrees. As the class went on the temperature rose. I kept a close eye on the thermometer throughout the class just so I would have my facts straight for the blog post! The final temperature was about 96 degrees. And let me tell you, it was HOT!
There was sweat dripping from my whole body. Even my elbows, which I didn't even know could sweat. My whole body was drenched; it felt like I had just gotten out of a swimming pool. The glass mirror was fogged up and my fingers were even wrinkled.
In the beginning they started it out with us laying down and just breathing. After everyone had kind of warmed up we moved on to some more challenging poses. Downward dog, warrior, and pigeon pose (my favorite!) were just a few of the poses we got to learn. The most challenging part was at the end when the temperature was at it's highest point and my whole body was shaking.
The class ended with "Final Savasana" which is just laying there with our eyes closed. This gave us time to kind of just breathe and cool down. And the best part, one of the instructors came and put a freezing cold towel on everyone's head.
Hot yoga was a great experience and something you should definitely think about trying! The class was super challenging and I think that's why I loved it so much! It is something I will definitely be doing again. What is the most out-of-the-box workout you've every done?
For more information click this link here: http://www.hotasanayogastudio.com/


XOXO
Katie :)

Wednesday, August 19, 2015

Pistachio Cupcakes w/ Cherry Frosting


These cupcakes are marvelous! Even if you don't like pistachios you will love these cupcakes. Have fun baking these pistachio treats.


Ingredients:
1 cup unsalted Pistachios
1 cup All-Purpose Flour
1 tsp. Baking Powder
1 Pinch of Salt
3 Eggs
3/4 cup Granulated Sugar
1/2 cup unsalted Butter (1 stick)
1/3 cup Milk
Green Food Coloring

What You Will Need:
12 count Cupcake Pan
Cupcake Liners
Chopper or Food Processor
Cutting Board
Large Bowl
Measuring Spoons
Sifting Utensil
Measuring Cups
Kitchen Aid Mixer w/ Whisk
Microwaveable Bowl
Scoop or Large Spoon
Toothpicks
Cooling Rack


                                                  How to Make Your Pistachio Cupcakes


1.  Preheat oven to 350*F and place liners into cupcake pan.


2.  Chop pistachios into tiny crumbs, almost like a powder, with your chopper on your cutting board.


3.  Measure flour, baking powder, and salt and sift in large bowl.


4.  In your mixer, whisk eggs and sugar for 20 seconds.


5.  Stir in your flour mix. Whisk for 20 seconds.


6.  Mix in chopped pistachios. Whisk for 20 seconds.


7.  Pour in milk. Whisk for 20 seconds.


8.  Melt butter for 15 seconds on LOW heat.


9.  Mix in butter. Whisk for 20 seconds.


10.  Squirt 2 drops or more of green food coloring into your batter. Whisk for 10 seconds or until your batter is the color you want.


11.  Scoop or spoon batter into your cupcake liners about 2/3 full. Remember too little batter in the cupcake liner is better than too much.


12.  Bake cupcakes for 15-17 minutes


13.  Once your timer goes off, stick a toothpick into one of the cupcakes. If it comes out clean your cupcakes are finished. If not, set timer for 1 minute and continue to bake cupcakes until the toothpick is spotless.


14.  Take your cupcakes out of the oven once baked fully. After about 2-3 minutes, carefully remove cupcakes from pan and set on cooling rack. Let cool for about 5 minutes.


Cherry Frosting

I have used this frosting recipe many times without the cherries. This frosting is my favorite because it is delicious and I learned it from my grandma. With the pistachio cupcakes this cherry frosting bomb will amaze your taste buds. 

Ingredients:
1/4 cup unsalted Butter (1/2 stick)
1 tsp Vanilla
10 oz Maraschino Cherries
4 cups Powdered Sugar 
4 Tbs Milk 

What You Will Need:
Kitchen Aid Mixer w/ Paddle
Measuring Cups
Measuring Spoons
Large Spatula 
2 Small Bowls 
Piping Bag
1M Tip
Tray or Plate


How to Make Your Cherry Frosting


1.  Beat butter for 20 seconds or until creamy.


2.  Add the vanilla. Beat for 20 seconds.


3.  Drain the cherry juice into a small bowl. Set aside.


4.  Dump cherries into a separate bowl. Beat the cherries with the butter and vanilla for 20 seconds. Make sure cherries are in small enough chunks to fit through the tip of your piping bag.


5.   Beat in powdered sugar for 25 seconds.


6.  Beat in milk for 25 seconds.


7.  If needed add 1 cup of powdered sugar and a tablespoon of milk for more frosting. I had plenty of frosting with these measurements though.


8.  Fill piping bag with frosting and start piping your frosting onto the pistachio cupcakes.


9. Serve cupcakes on a tray or plate. Eat and Enjoy!


                                                                         Anna Banana


Follow

Sunday, August 16, 2015

Making the Best of My Bedroom | Katie

We all have this perfect image of our dream rooms in our head and it's not even close as to what your actual bedroom looks like. I moved downstairs about three years ago to the guest bedroom. It has green walls and an animal wallpaper border around the top. At first I couldn't bear the sight of it. I just thought it looked so ugly. People would always ask me why my room was themed "Africa." With time, the elephants and zebras didn't bother me anymore and I just try to make the best of it! Here is my bedroom :)


XOXO,


Katie :)


Follow

Wednesday, August 12, 2015

A Summer Update


Summer is coming to an end and as the seasons start to change, so does life. It’s been a while since we have shared an update and what better time than the end of a chapter of our lives! This summer I was a nanny for 2 girls who are 7 and 12. It was fun to be able to go swimming, on picnics and adventures like the Exploration Place! Before I started nannying , Anna and I’s family went on a mission trip to Rocky Point, Mexico with our church. We built a house with no power tools in 2 ½ days. It was hard work but a very rewarding trip!

 We also went to St. Louis for a family vacation in July and had fun going to the City Museum and the St. Louis Zoo where we were able to see a polar bear for the 1st time! Anna spent her summer at several camps including a drama camp where they performed the musical, “Annie”. She was the role of Lily St. Regis and did a phenomenal job portraying her character!


 Katie answered phones at her dad’s company this summer. She also went on several lake vacations at Table Rock Lake. She enjoyed her time on the boat but was always happy to be back at Lakeway!


 As for the 3 of us together we have enjoyed many nights and weekends together whether it’s been planning for the blog or hanging out and sharing life with one another! We have enjoyed our summer tremendously and we want to hear about yours! Tell us a favorite memory in the comments below!
with love,
Caroline

Follow

Sunday, August 9, 2015

Getting More for Less & My 5 Essentials | Katie

Cha-Ching! Are you ever in the situation where you feel like you are spending more than you are buying? This thought usually rises to my attention when i'm back to school shopping! Take it from a fellow shopaholic, getting home and seeing that you didn't buy as much as you had thought is a terrible, awful feeling. This post is going to give you a clue as to how to get more for less and to leave you looking fabulous. 

Scenario: You walk into a store and the first thing you see is the most gorgeous top ever. You walk over in awe to get a closer look. Unfortunately the only thing that captures your attention is the pricetag. Ugh. Something you want so badly to be able to afford but you know that you just can't. There is a reason as to why this is happening. Stores have many ways to trick you into spending more money! One of them is putting the most expensive things in the front so they are the first things you see. Something to try: Walk straight to the back to the store. Start shopping from the back and make your way up. You will find yourself getting much more than you had previously intended.

“So before you choose something, think of yourself wearing it, say to yourself, is this me?” 
-Sandra Bullock, The Blind Side. I think the key to any kind of shopping is buying what you feel confident in.When you are back to school shopping I think that it is important to focus on something that you love and not what is popular. Buy things that suit you and your style. If you just own it and be confident, it won't matter if it's not the latest trend. 
 GIF by: Tumblr
Buying simple things is crucial when back to school shopping. You can mix and match, layer, accessorize, dress up, or dress down basic articles of clothing. For instance buying a plain white t-shirt would create so many outfit options. You could wear it with jeans for a casual outfit, with leggings for a comfortable outfit, or with a skirt for a dressy outfit. Here are a few essential things that might inspire you on your shopping spree:

  •  Plain t-shirts~Whether they are white, black, red, or blue, get some that are comfortable and are a perfect fit!
  • Some kind of denim~ It could be a chambray, a jean jacket, or even a pair of overalls! Trust me, anyway you decide to wear these, it will be super cute! They match with almost everything and can really amp up your outfit.
  • A statement necklace~I don't know about you, but I am 110% a jewelry person! And statement necklaces have been the most helpful things to me when I'm pulling together an outfit. They can dress it up or down, add a pop of color, or step-up your style. 
  • A GOOD pair of jeans~I can not stress enough how much you need a good pair of jeans. Making sure they fit you everywhere is vital. Bonus points: Get some that are super comfy! I usually buy mine at American Eagle because they have such great quality and they fit really well.
  • Shoes that go with everything~ It's 6:30 A.M. and I have the cutest outfit picked out. I've eaten, brushed my teeth, and fixed my hair. All that's left is picking out a great pair of shoes. But I don't have anything to match my rockin' outfit. I think it's necessary to have a good pair of shoes that match everything. Some of my favorites are white Keds or Converse, a brown pair of boots, and some black heels or flats


Shopping at the back of the store and moving up, staying confident, and getting the essentials are just a few tips I have for you! I anticipate that you will have an awesome school year and make memories that will last forever! I hope our Back to School week long series helped you in some way and that you continue to follow 2 Blondes & a Redhead in the future. 
Be sure to follow us on Pinterest, Instagram, Twitter, and Bloglovin' and like our facebook page for updates on our blog! Our next post will be on Wednesday the 12th of August. 
XOXO
Katie
  Click here if you missed any of the back to school posts.

Follow

Saturday, August 8, 2015

A Day in the Life of a Homeschooler


You may already know that I am homeschooled. I have been homeschooled since I was in 4th grade.My oldest brother Lucas was homeschooled the year before and my mom liked it so much that she wanted us all to be at home. These past 3 years of homeschooling have been wonderful! My favorite part about being homeschooled is having more flexibility in my schedule. Also, my brother Andrew and I spend a lot more time together. We have invented our own games to play both outside and inside.  The both of us do a great deal of the same schoolwork so we have learned to work together better. On a normal school day we wake up at about 8:00am. Sometimes my whole family eats breakfast together and we have a morning devotion. Caroline, my oldest sister and fellow blogger, will go back to her room and work on her school. Lucas will go to his school. Dad will head off to work.  Andrew and I will start on math with mom. This year for math I will be doing a curriculum called Life of Fred. Each lesson is a funny story about a character named Fred that somehow leads to learning about math. After that, we start reading. Some of the books we are going to be reading this year include Out of the Dust, Dear Mr. Henshaw, and Guests. My brother and I might go outside and play around with a ball for our recess or when mom needs a break.  Our lunch is normally around noon. The menu is usually a sandwich, spaghetti, or chicken  nuggets. After lunch we complete whatever schoolwork we have left for the rest of that day. On some days I have practice or a game whether it's basketball or volleyball or a track meet. Other days I finish school and play a board game with my mom or Andrew. That's the end of my school day! Fun, huh? Homeschooling has been a marvelous opportunity for me. Have a great school year!
                                                                                          

   - Anna Banana


Follow

Friday, August 7, 2015

Heart to Heart:Stress Reliever


During the school year things can become pretty hectic at my house. Everyone is going to their different activities and sitting down with the whole family for dinner becomes a rare case (unless my mom decides to not let any cars leave until we have all finished our dinner together). For the upcoming school year I decided to find a couple of verse to hang up on my wall that would be my stress reliever verses. I wanted to share them with you in case you were looking for some scripture that would remind you to take a deep breath and trust God. 

John 14:27 ESV- “PEACE I leave with you; my peace I give to you. Not as the world gives do I give to you. Let not your hearts be troubled, neither let them be afraid.”
Romans 16:20 ESV-“The God of PEACE will soon crush Satan under your feet. The grace of our Lord Jesus Christ be with you.”
Psalm 118:5-6 ESV-“Out of my distress I called on the Lord; the Lord answered me and set me free. The Lord is on my side; I WILL NOT FEAR. What can man do to me?”
Psalm 94:18-19 ESV- “When I thought, “my foot slips,” your steadfast love, O Lord, HELD ME UP. When the cares of my heart are many, your consolations cheer my soul.

Have a blessed day!
with love,
Caroline 

Follow

Thursday, August 6, 2015

Recipies to Make for a Delicious Packed Lunch

Do you ever get tired of packing a lunch? Everyday a sandwich, a cup of fruit, and an Oreo. Want something different? Here are a few ideas for a delicious packed lunch.
                              
                                               Chicken,Cheese, and Spinach Pita Pocket

 I ate this for lunch yesterday, and it was marvelous! It was small but still filled me up. This Pita Pocket is full of protein from the chicken and the spinach is packed with vitamins. This is a healthy and easy dish for a packed lunch. Plus, it's better than a sandwich.


Ingredients:
1 cup Grilled Chicken
2 cups Spinach
3-4 oz. Any Cheese (I used Feta Cheese)
1/4 cup Ranch

What You Will Need:
Cutting Board
Knife
Mixing Bowl
Large Plastic Tongs
Small Tupperware


                          How to Make Your Chicken, Cheese, and Spinach Pita Pocket


1. Prepare your chicken anyway you want. I grilled mine but you can fix yours anyway you want. 


2. Once your chicken is done cut into small chunks on your cutting board. Make sure your chunks are very small so they will fit in the pita pocket.


3. Measure out your chicken and dump it in a mixing bowl. 


4. Measure out your spinach and add it to the chicken. Start mixing the two ingredients together with your tongs or a mixing utensil.


5. Add desired amount of cheese and Ranch to the chicken and spinach. Mix all four ingredients together.


6. Stuff your mixture into the pita pocket. If you have leftover mixture you can make another pita pocket or save it for the next day.


7. Place your pita pocket(s) in your small tupperware and your lunch is 1/3 of the way packed! 


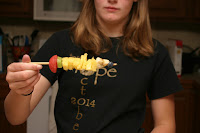
                                                                 Pencil Fruit Kabob

I first thought of this idea when the three of us girls were talking about a Back to School theme week. Food placed in a certain way to look like a pencil. Once we continued to brainstorm I thought of watermelon and pineapple. How about a fruit kabob!  This is something different and a variety of fruit lined up in a creative way. Have fun making this kabob, I know I did!

Ingredients:

Pineapple                                                              
Banana                                                                  
Kiwi
Watermelon
Blueberry

What You Will Need:
Chopstick or Skewer
Cutting Board
Knife
Ice Cream Scoop


                                                  How to Make Your Pencil Fruit Kabob


1. Set your cutting board on a clean surface. Chop off the stem of your pineapple. Cut your pineapple in 1x1 small chunks. You will most likely need 5-7 chunks. Take your chopstick or skewer and stick it right through the center of the pineapple. You have made the middle of your pencil!


2. Peel the banana and slice it into pyramids. Slice the pyramid in half but make sure the banana is thick enough to stay on your stick. Poke the base of your banana triangle next to either side of your pineapple on your skewer.


3. Next peel the kiwi. Slice the peeled kiwi into slices and cut those slices in half. Push the center of the kiwi on the opposite side of the banana on the skewer.


4.  You might have been wondering why you would need an ice cream scoop for a fruit kabob. Well, it may be a little out-of-the-box but you are going to have a scoop of watermelon for your pencil eraser. Stick the scoop right next to the kiwi on your skewer.


5. You could say this is the easiest part of the whole kabob. Grab a smaller blueberry and push it in next to the banana triangle.

6. Can you see the shape of the pencil? Your lunch is more than halfway done! 


                      Chocolate Chip Rice Krispie Treat
My mom and I were talking about this post and I asked her if she had an idea for a little dessert for a packed lunch. We started thinking of small sweet snacks, rice krispie treat popped up in the conversation. Super easy to make and pack for a lunch sweet. I added chocolate chips just to add a little more sweetness.
Ingredients: 
1/4 cup Butter or Margarine 
1/2 cup Choc. Chips
1 Bag of Marshmallows (10 oz) or 4 cups of Mini Marshmallows
1 tsp Vanilla
6 cups Rice Krispie Cereal

What You Will Need:
Non-Stick Spray
13x9-inch Pan
Large Saucepan
Measuring Cup
Large Plastic Spoon 
Large Bowl
Small Spatula
Butter Knife
Ceramic Wrap


How to Make Your Chocolate Chip Rice Krispie Treat


1. Grease the 13x9-inch pan with the Non-Stick Spray. 


2. In the saucepan melt the butter, marshmallows, and chocolate chips over LOW heat. Stir constantly so your chocolaty goodness doesn't burn your pan.


3. Once your marshmallows are melted completely remove saucepan the from heat. Don't forget to turn off the stove! Add Vanilla and continue to stir your goodness.


4. Measure the cereal and pour into the large bowl. 


5. Mix your chocolaty goodness and cereal together with your spoon. Make sure you scoop out all of the mixture from the saucepan with your spatula.


6. Dump your Rice Krispie mix into the 13x9-inch pan. Let  it cool.


7. Cut your Rice Krispie Treats into small squares and wrap in ceramic wrap. Place in your tupperware with the rest of your lunch. You are finished!


- Anna Banana
Follow